


Once the base and skin of synthetic leather exist, printing or coating can adjust colour, feel and gloss. This is what surface finishing means here, and the steps are chosen or repeated according to what the product needs.
On PVC and PU, colour and coating are applied to the finished surface. Silicone leather may build its top coat first or apply it later, so the first question is which route made the roll you have.
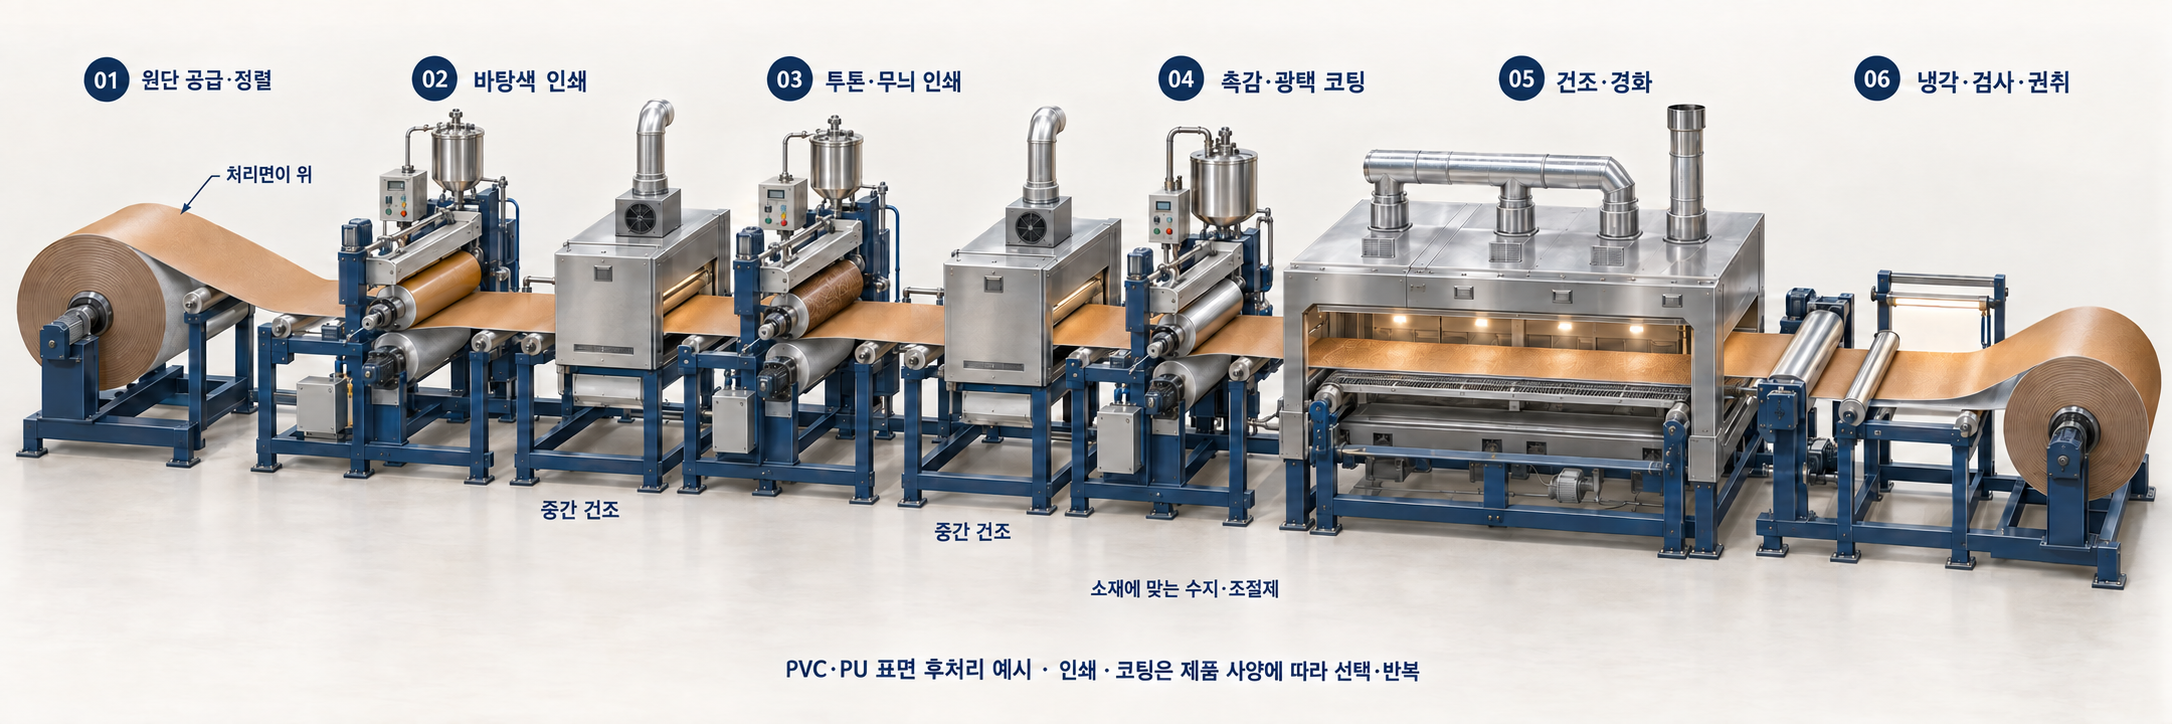
Not a factory photograph or a machine drawing. Covered roll contact, support structures and drying or curing conditions are not guaranteed by this diagram.
Choose the finishing to suit the surface you need
Surface finishing is separate from the five main production processes: it adjusts colour, feel and the rest. Not every product is finished this way; the printing and coating chosen follow the specification.
The diagram arranges equipment that is commonly used together. Chemistry and sequence differ by material, so it is not a work standard you can apply as it stands.
The order of printing and coating on PVC and PU
The finished PVC or PU roll is fed into the finishing line. Where release paper was used, it must be peeled off to expose the face to be treated. Even if the backing faced up in an earlier process, it goes into this line with the working face up.
- Line up the working face and track the fabric
Once the working face and the reverse are confirmed, the fabric is centred across its width and the tension set. Contamination, moisture and any existing coating also have to meet what the chemistry requires.
- Print the base colour and dry
Colour paste or ink sets the shade and how completely the base is hidden: the degree of coverage. Drying follows the recipe for that coat, so the next pass does not disturb the film already formed.
- Add two-tone or pattern, then dry
Colour is picked up on a pattern roll or on the raised parts of an embossed surface, setting the contrast and texture between two colours. Products that do not need two-tone skip this step.
- Coat for feel and gloss
The resin that forms the film is the binder. It is chosen from acrylic, PU and similar families, together with additives for feel and matting. A clear or pigmented finish delivers the feel, gloss and surface performance required.
- Dry, and crosslink where the system needs it
Water-based and solvent-based systems form the film by removing water or solvent. Crosslinking systems also have to satisfy the resin's reaction conditions. Drying off volatiles and crosslinking are two different things.
- Cool, inspect and wind
The film is checked and cooled, then colour, gloss, feel and appearance are compared with the approved standard before winding. The inspection station in the diagram marks where inspection happens conceptually; it is not equipment you must install.
The diagram splits the functions across three coating heads. In practice the same line may be run several times, or some heads skipped. Printing changes colour and pattern; embossing creates the texture.
Applying the silicone top coat after release
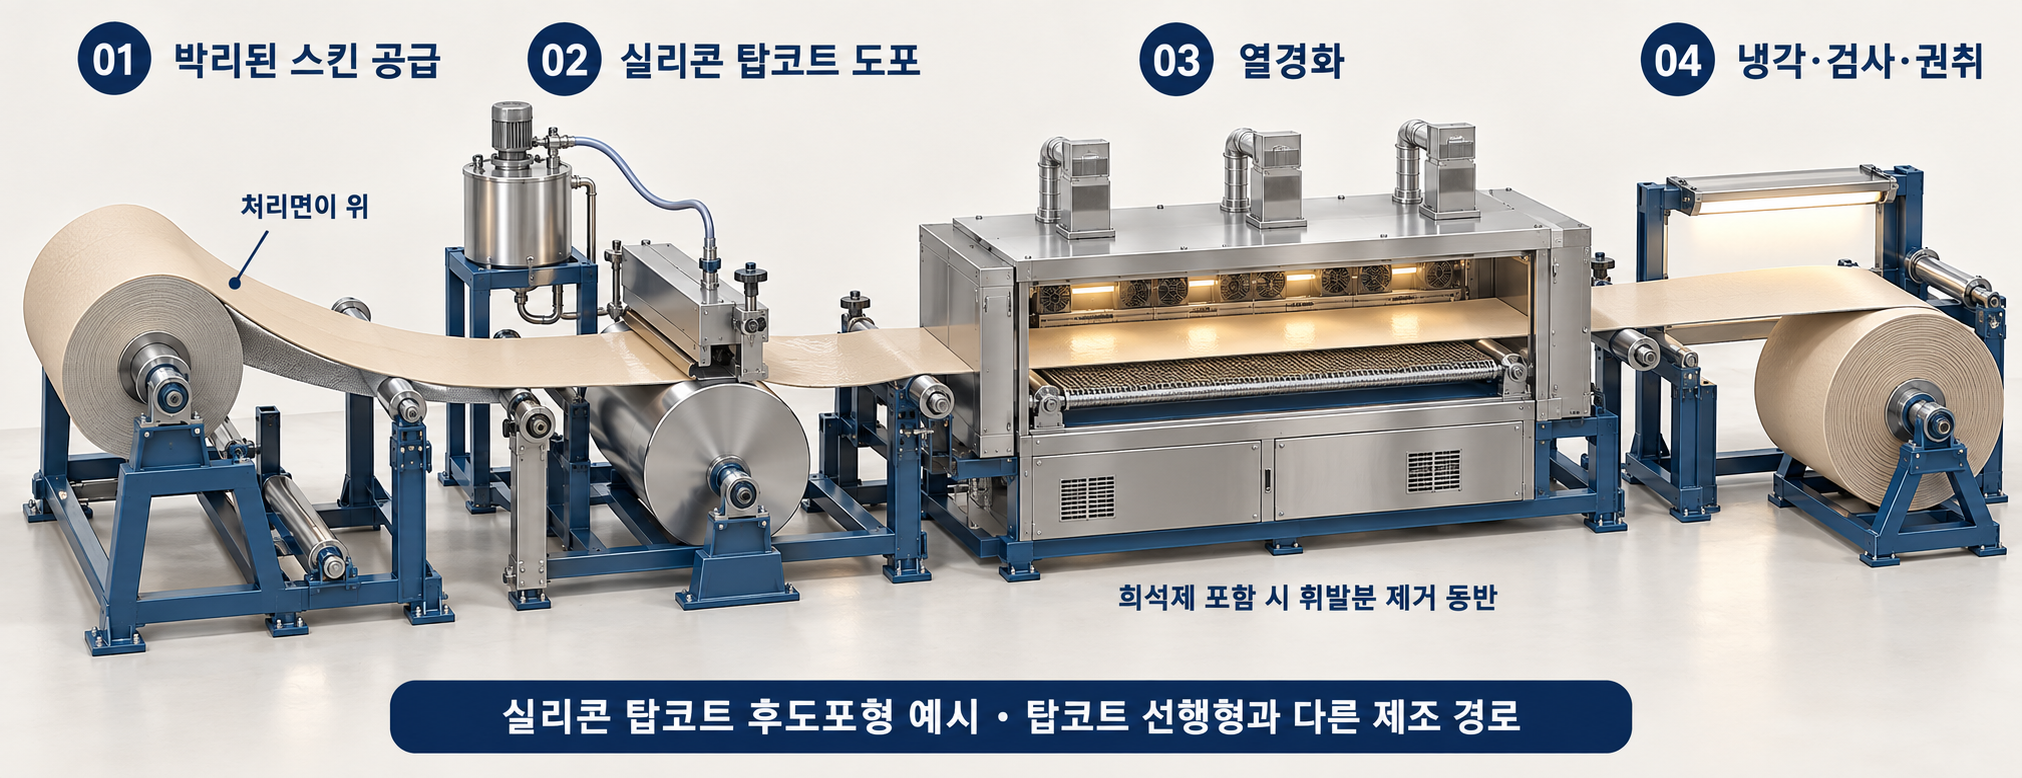
The diagram shows the later-coat route: skin, adhesive and backing are bonded, the carrier is removed, and the top coat goes on afterwards. It does not mean a top-coat-first product must go through this step.
- Feed the exposed skin
The roll without its top coat is fed in. The face to be treated is the skin.
- Apply the silicone top coat
The chosen silicone top coat goes on at the set weight. The diagram arranges the knife method from the patent as a concept.
- Cure, and remove whatever volatiles remain
The addition-cure system here crosslinks by chemical reaction. Recipes containing diluent also give off volatiles as they cure. A separate pre-dry is not needed in every case.
- Check the film, then cool, inspect and wind
Once the film is checked, the roll is handled and wound. Whether post-curing is needed, and under what conditions, follows the product documents.
Whether a top coat, pigment or additive suits the system has to be confirmed under the adhesion, dispersion and cure conditions of the actual recipe. Do not assume an ordinary acrylic or PU finishing liquid works on silicone as it stands.
Adjusting and comparing feel, colour and gloss
Feel
Feel depends on the binder, but also on the feel additives, the coating weight and the state of the surface. An acrylic resin on its own does not determine the feel. Compare against the approved physical swatch: slipperiness, softness, tack.
Colour
Pigment or ink concentration, coating weight and the base colour are all adjusted. Compare under standard lighting against the agreed colour reference; a screen is not the delivery standard.
Two-tone and pattern
Pattern roll, contrast between the two colours and colouring of the raised areas set the position and strength of the pattern. Printing does not create emboss height.
Gloss
Matt, semi-matt and gloss finishes, matting additives and surface geometry all affect gloss, and gloss must not be confused with how light or dark the colour is. Agree the method and the angle, then watch how it changes from new to worn.
Finish durability
Check the binder and crosslinker, the coating weight, and how well the film dried and cured. Depending on the product, look at adhesion, abrasion, flexing, tack and blocking. This guide sets no pass figures.
Each material has its own surface and chemistry
PVC casting and calendering
Some PVC surfaces run through a shared printing and coating line. The chemistry is not limited to acrylic; it is chosen from acrylic, PU and similar families to suit the surface. Check that the recipe suits the base and that adhesion and flexibility hold.
Dry-process PU
After the skin is made and any release done, colour, two-tone, feel and gloss finishing are selected. Check what the finishing liquid does to the existing skin; not every PU finish is interchangeable.
Wet-process PU base
Decide first what surface is wanted. The porous base can be treated directly by gravure, transferring the liquid with a roll, or a skin is made and then transferred or laminated. Winding the base is not the last step for every product, and one thin top coat does not always replace a separate skin layer.
Silicone leather
In the top-coat-first route the top coat made first becomes the surface after release. In the later-coat route it is applied to the released skin and cured. Whether silicone and organic-resin recipes can be shared has to be checked separately: a case using a particular acrylic carrier pigment does not prove that an ordinary acrylic film will bond to silicone.
Drying removes volatiles; curing reacts
Drying
Removes the water, solvent and other volatiles from the film. PVC and PU finishing using water or solvent also removes volatiles.
Curing and crosslinking
A film gains its final properties through chemical reaction. The silicone route chosen here cures by addition reaction. A dry surface does not prove the cure is finished.
What to check in a silicone recipe
Look at whether a diluent is present and how volatiles are removed, and keep top-coat curing separate from optional post-curing. Temperature and time follow each recipe. The word silicone alone does not make a system solvent-free.
The finishing specification comes from the sample and the product documents
The number of print passes, whether two-tone applies, the chemistry combination and the temperature, airflow, time and coating weight are all set by the product and equipment documents. On the references alone, silicone two-tone printing and direct application of ordinary organic-resin films cannot be described as common processes.
Decide together which product it is for, which physical sample is approved and what testing is needed. The colour and gloss delivered are checked against the approved standard, not against an image.
Sources
- Rollmac · Printing and finishing line
PVC/PU line; printing, finishing, drying and winding
- Stahl · Permutex
Polymer ranges; additives; top coats/finishes
- Stahl · Stay Silent
Range; PVC/PU applicability; 2K application
- Rollmac · LABLINE
SYNCHRO multipoint; two-tone; design cylinder
- HIRANO TECSEED · Gravure Coater
Direct/Reverse; Kiss; Doctor Chamber
- HIRANO TECSEED · Dryer
Nozzle variations; roll support; non-contact feeding
- Sanyo Chemical · Surface finishing by gravure
p.3 Table 3; p.5 §C and Figure 3; p.6 compatibility
- Sanyue · BLPP acrylic-carrier pigment paste
Applications; silicone leather post-treatment
- Dow · EP4271762B1, Coating composition and its uses
p.3 [0004]; pp.13–14 [0084]–[0093]; Figs.1–4
- Ocean Plastics · PU Knowledge
The Dry Process; Wet Process and PU Coagulation; Water-Based PU Leather
Written with reference to the sources above. The specification and performance of the material you buy must be confirmed from its own datasheet and test reports.
Enquire with this guide
Tell us the product or the change you have in mind. The title of the guide you are reading is added to your enquiry.
Prepare your enquiry